Most people enjoy taking photos - it's a great way to store, share, and keep memories. Many begin having a desire to expand on their photography, including myself. As an enthusiast, I continue to learn as much as I can, but just like many, I had to start somewhere too. There's a lot of information out there, a lot of terminologies to learn and remember, but today, I'm going to take you on a crash course on some basic terms used in photography, and then understanding the different functions of a camera and how they work.
For those who are new to photography, I hope this tutorial helps you better understand what your camera is capable of. For those who are more familiar with cameras, I hope this will give you some insight into other capabilities of your camera that you may not have tried, or realised was there, yet.
Of course, this will not dwell into every function, just the main ones - most of the extra functions and features branch off from the main standard function either way. Also note that some of the terms used will be based more on Sony cameras, as I primary shoot with Sony.

First, we'll need to understand some basic photographic terminologies:
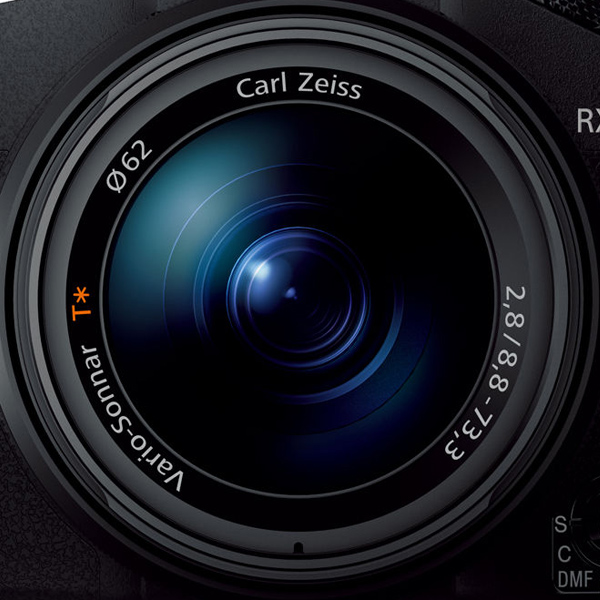
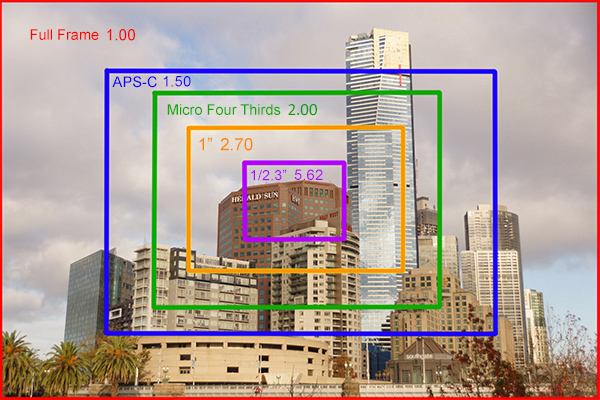
- 35mm Equivalent: Back in the days of film, 35mm was the standard size, which is why when comparing sizes, measurements, standards, etc, we compare it to the 35mm equivalent. Full frame cameras use this size, thus sometimes things are compared to full frame cameras. These comparisons in turn introduces crop factor. Crop factor is the effect due to the size difference in sensors. For example, a 1" sensor is approximately 2.7 times smaller than a full frame sensor (35mm equivalent), thus has a crop factor of 2.70. This crop factor affects both focal length and depth of field. What this means is, a 18mm f/2.8 lens (focal length of 18mm and aperture of 2.8) on a full frame camera will be 18mm f/2.8 like in the days of film, but putting that lens unto a 1" sensor camera means it will be the equivalent to a 50mm (48.6mm to be exact) f/7.5 lens on a full frame camera, which results in a deeper depth of field. So if you want to achieve the same 18mm of the full frame camera on the 1" camera, you'll need to use a 6.66mm f/1.03 lens on the 1" camera in order to get a similar focal length and look. So in review, 50mm on a full frame camera will look similar to 18mm on a 1" sensor. These focal lengths and apertures are usually labelled on the lenses, eg. the Sony RX10 II has a focal length of 24-200mm equivalent (meaning, compared to a full frame camera, you'll be getting 24-200mm for your focal length), but the actual focal lengths used on the lens for the 1" camera in order to achieve this equivalent, is 8.8-73.3mm (8.8 x 2.70 = 23.76, 73.3 x 2.70 = 197.91).
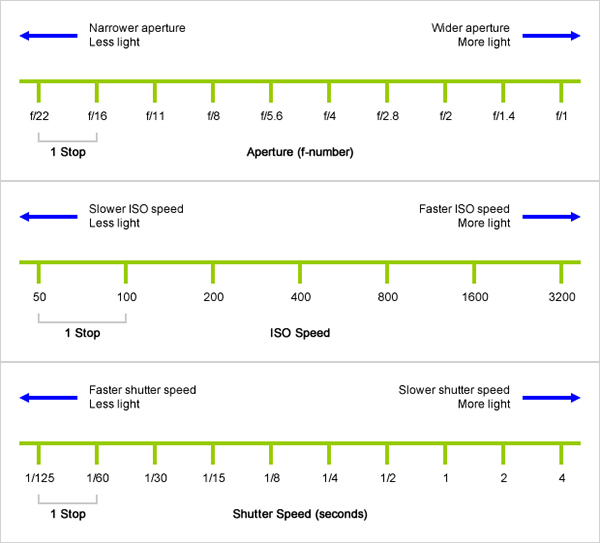
- Aperture: The iris of the camera, like the iris in our eyes; it controls how much light can come into the camera at any given time by controlling the size of the opening via aperture blades. You'll usually see its values after an f, f stop, eg. f/2.8, f/4, f/5.6, etc. Notice that you have a slash between the ' f ' and the numbers. This is because the values work inversely. Thus, the bigger the number, the smaller the actual aperture (opening), just as the smaller the number, the bigger the aperture. Having big apertures (small numbers) also means that less of the image is in focus, a shallow depth of field, where having small apertures (big numbers) means having more of the image in focus, a deep depth of field.

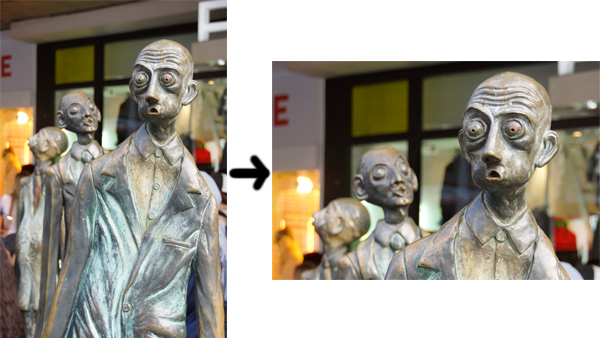
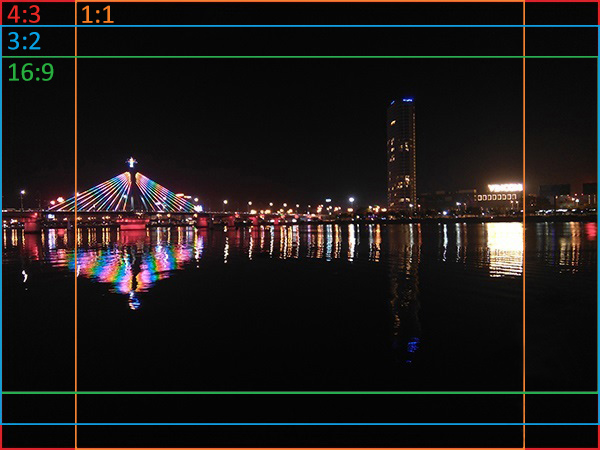
- Aspect Ratios: The aspect ratio is the ratio between the width and height of an image. For example, a regular photo print of 6x4" has a 3:2 ratio. Depending on the ratio you use, you'll also get certain perspectives - your image will either have more or less of some portion of a scene. Please note that there is not standard aspect ratio, it just depends on the size you like and how much you want to fit in. Thus 1:1 isn't necessarily smaller than 4:3, as it can be the same width-wise, and have more height-wise.
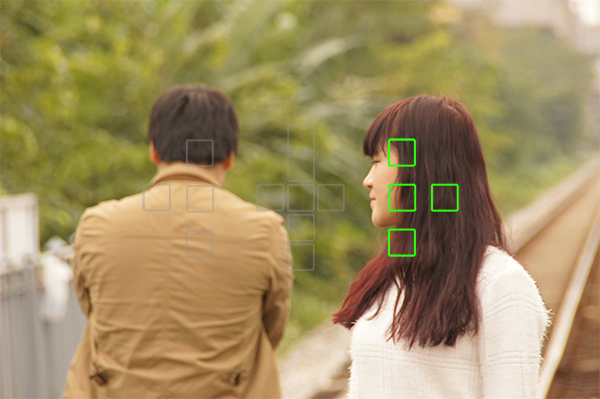
- Auto Focus Points: A typical camera will have a set of points that it uses to focus on its subjects. You can allow the camera to automatically select the points it thinks it needs to use to focus on the subject you want, or you can choose the point yourself to pick the exact subject you want.
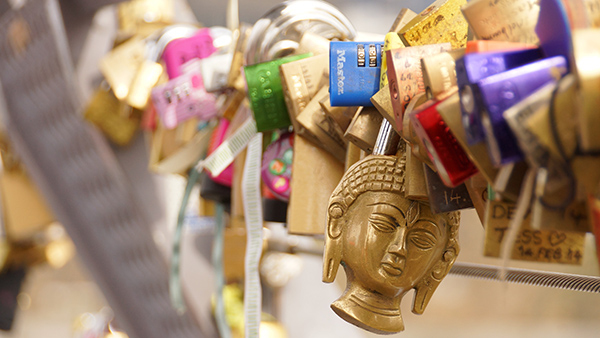
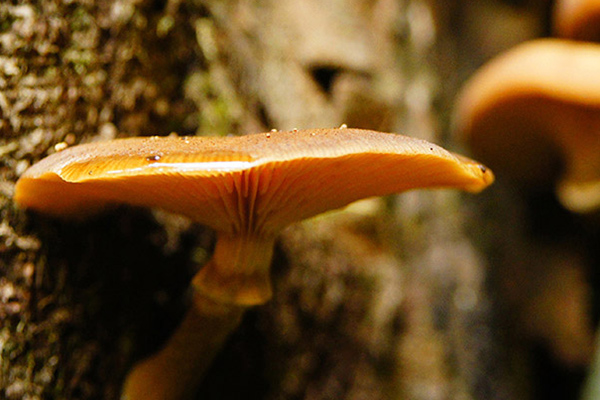
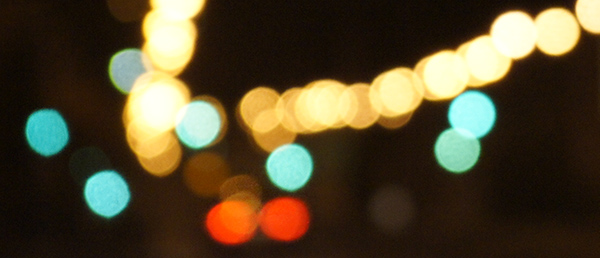
- Bokeh: Bokeh is a term used for the blur in the foreground and/or background. The more even and smoother the blur, the better the bokeh is considered to be. The quality of the bokeh will depend on the shape, size, and amount of aperture blades that there are in the lens.
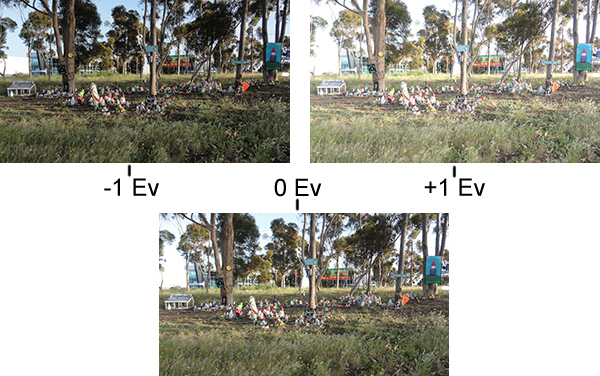
- Bracketing: Bracketing is when you take an image of the same scene at different exposures, so if your image was too bright, you have a darker image, which is hopefully correctly exposed, available and vice versa, a shot too dark, you'll also have a brighter image for back up. Bracketing is also useful for when you want to combine all of the images together into one image, which is then known as an HDR image.
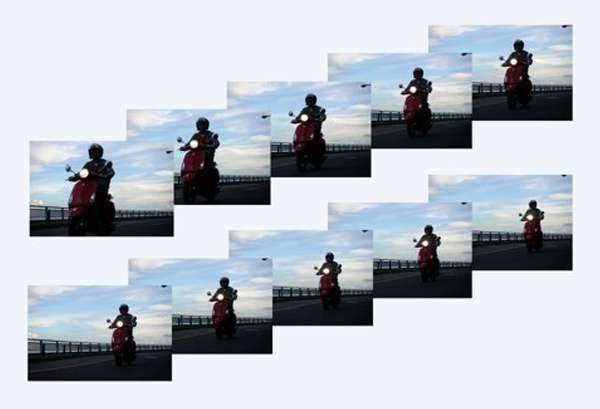
- Buffer: When doing burst shots, your camera will constantly take images and write (save) them to the memory card. Unfortunately, the camera and memory card can only write so fast, compared to the amount of images you take, thus the images waiting to be written need to be temporarily stored somewhere, which is known as the buffer. The greater the buffer, the more you can temporarily store there whilst the camera is writing, which means you can shoot longer before the buffer hits its limit. When the camera hits its buffer limit, then the burst rate will generally slow down to about 1 shot per second, or even slower, as it'll only take the shot as space in the buffer becomes available.
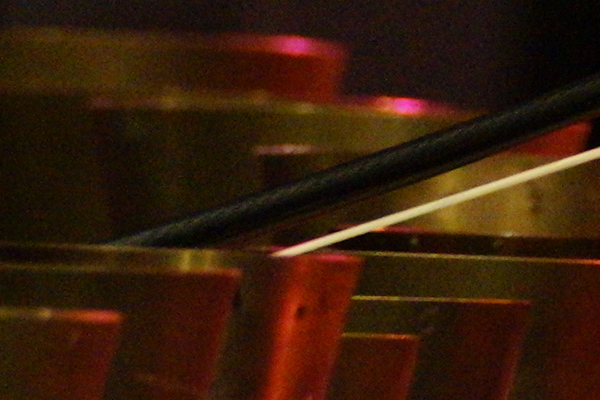
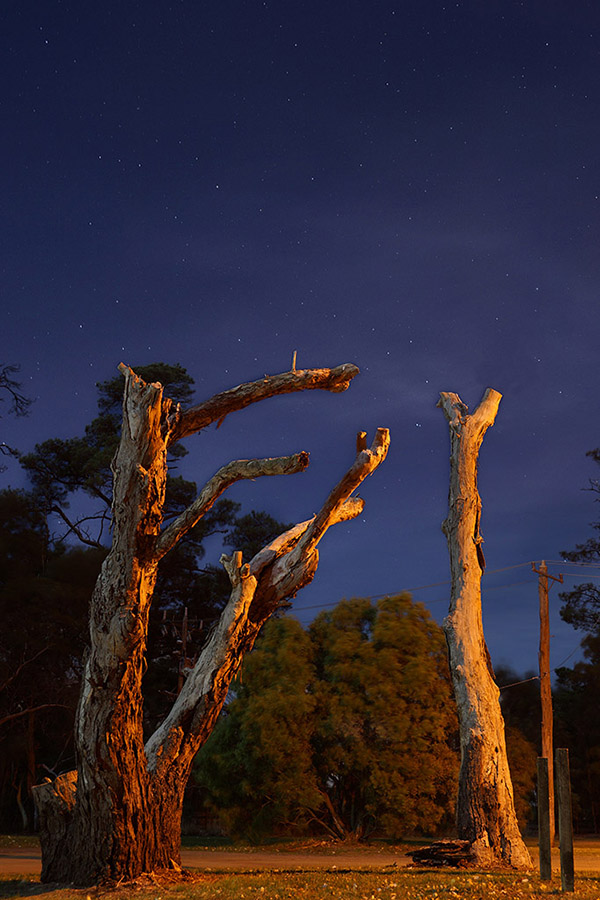
- Bulb Mode: When the shutter speed is set to bulb, the shutter opens and closes depending on the user, ie. the shutter will stay open until you let go of the shutter button. This is great for capturing light, stars, etc - also known as long exposures. A lot of times, photographers will have remote shutter releases so that they can have a second shutter button off the camera which they can hold down, without touching the camera, eliminating the possibility of wobbling the camera. The remotes generally have a locking mechanism so that you don't have to physically hold the button down either, just lock it in place for the duration you want, whether it be seconds, minutes, or hours.
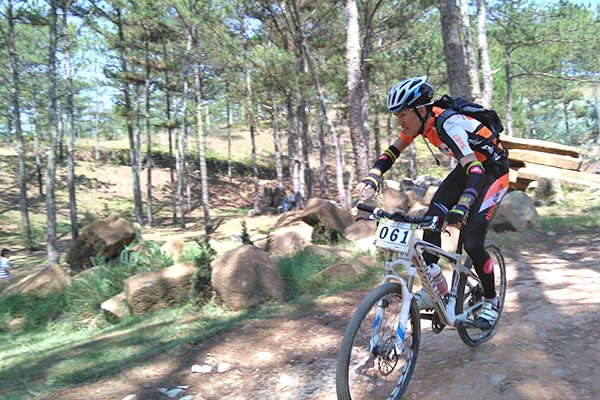
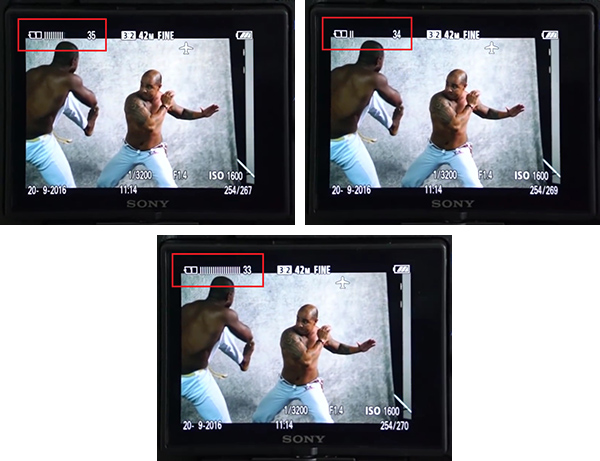
- Burst Shots: This is when the camera is set to continually shoot images whilst the shutter button is held down. Cameras generally have a burst rate, known as FPS (frames per second) of 3-12 images per second. You simply hold down the shutter button and away you go. This is handy as you don't know if the one image you took will be perfect or not, thus you take multiple shots, especially helping in sporting and wildlife - spray and pray, as they say.
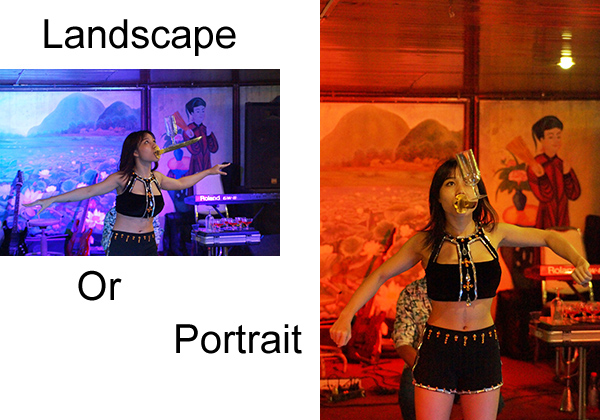
- Composition: Composition is how you want to frame an image, what you want in it, and what you don't want in it, etc. There may be times when you need to shoot wider, or you want to include more objects in your image, so you might zoom out. And there'll be times you want to focus more on the subject and have less of the background objects in the image, so you might zoom in, etc. Depending on how you want everything framed, you may use landscape or portrait views.
- Crop: Cropping is when you only want to keep a portion of the image and throw out the rest. This is cropping into the image, giving the effect that you took the image closer than you actually were. This is very useful for a lot of wildlife and sport photographers as there'll be times when their lens doesn't have a long enough reach (focal length) to get close enough, thus they crop in.
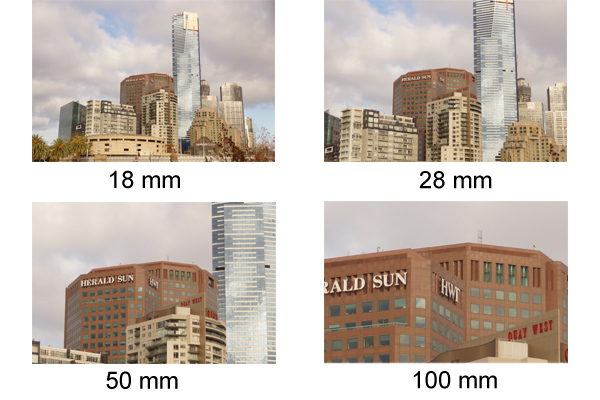
- Crop Factor: Using the same lens, you'll get different perspectives depending on the size of the sensor that you use. For example, lets say you take an image at a focal length of 18mm on a full frame camera, you'll get an image with all the buildings. Take the same lens and focal length of 18mm, but use a camera with an APS-C sensor, and you'll not see the top part of the building, and half of the side buildings will be missing, as it has a crop factor of 1.5, your effective focal length is 27mm. Take the same image again but with a camera using a Micro Four Thirds sensor, you'll once again have less captured in the image, an effective focal length of 36mm. Thus the smaller the sensor, the bigger the crop factor, and the less you'll see. It also affects depth of field. So say the 18mm lens has an aperture of f/2.8, only the Herald Sun building would be in focus and everything else would be blurred a little. Again, putting it on an APS-C sensor, the effective aperture is now f/4.2, and maybe you'll get the Herald Sun and the buildings in front of it in focus. The micro four thirds sensor will probably have the trees in focus also, if they were still in view, etc. Crop factor also works in reverse for calculative purposes only, as putting the lens of a smaller sensor onto a larger sensor body (camera) will introduce lens distortions.
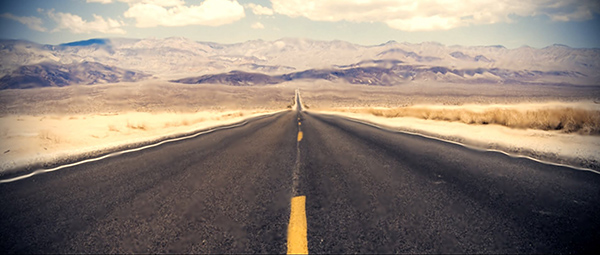
- Depth of Field: From front to back, its how much is in focus. When using a large aperture, the depth of field is small, meaning that what's in front of, and behind, the subject will be less in focus, even out of focus depending on the lens. The the vice versa works when using a small aperture which gives a the large depth of field, thus what's in front and behind the subject will also be more in focus.
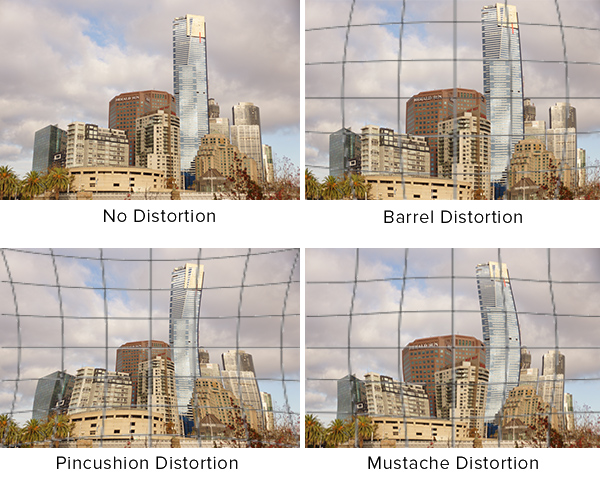
- Distortions: Image distortions can occur to the the lens, patterns in the scene, or even the affects of the environment, most commonly, heat waves.
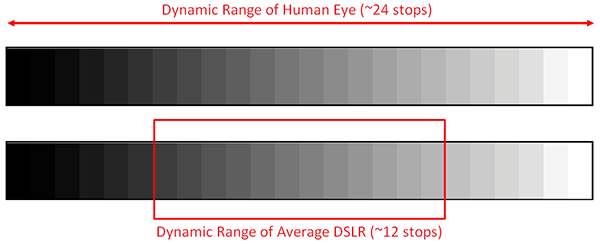
- Dynamic Range: How many tones of black and white the sensor is capable of capturing. The more dynamic range available, the more tones can be captured and the smoother the colours will look. Each tone is known as a stop of dynamic range. We can see the entire range, whereas a camera is much more limited. The tones that the camera is unable to see will simply be black or white.
- Exposure: When the image is just right, it's correctly exposed - a balance of shadows and highlights. When darker than it should be, or too dark, it's underexposed, and vice versa, overexposed when it's bright or brighter than it should be. You can see how much it is under or overexposed via a meter or exposure value, EV, which is usually displayed on your camera screen. Each EV value is a stop difference, thus, if you have an EV value of -0.3EV, that means it's a third of a stop underexposed. Or +1EV would be 1 stop overexposed.

- Lens Distortion: Lenses use various elements (glass) to reflect and bend the light onto the sensor. Due to all this, this can cause some distortions in the images that you shoot. Sony cameras can automatically correct most of the distortions, but some may prefer to do it themselves.
- Focal Length: A distance scale showing how far you see. Going up or down the focal length is known as zooming in and out. When zoomed out, you're shooting wide. When zoomed in, you're shooting tight.
- HDR (High Dynamic Range): Bracketed images are combined together so that the shadows and highlights are reserved from the over and underexposed images. This is done to retain details in the shadows and highlights in the final image.
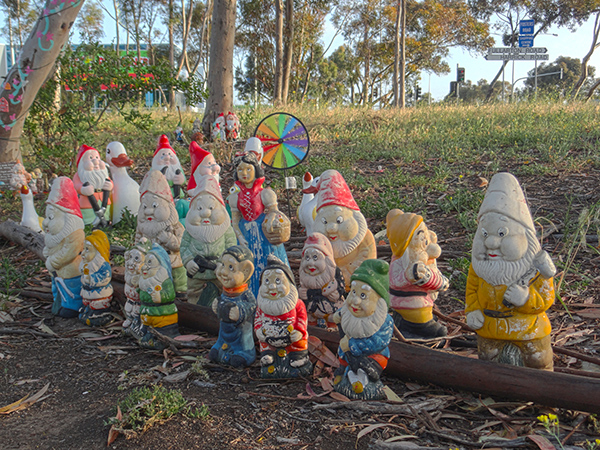
- Highlights: The bright areas of an image. When the bright areas are completely white and there's no detail, it's known as the details being blown. When the highlights are blown, you can't recover any details and they'll just be white, thus you don't want any blown highlights.
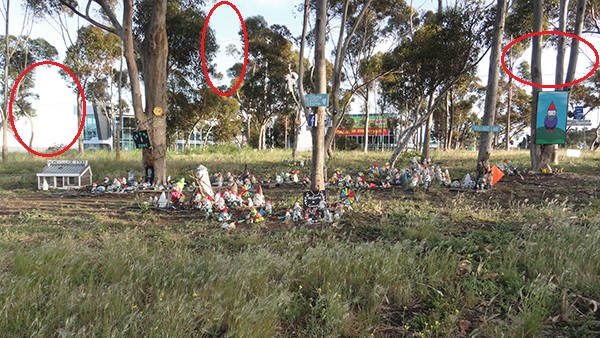
- Image Stabilisation: Cameras generally have either stabilisation built into them or into the lenses used, while some have none. Stabilisation helps by compensating for the shaking and wobbling in your hands as you hold the camera, press the shutter button, or move the lens. Without stabilisation, you'll get blurry images, unless you capture at a shutter speed high enough to counteract the movement of you and/or the camera.

- ISO: How sensitive the camera sensor is to the light. The more sensitive it is, the more amount of light is captured during the time the light is hitting the sensor, and the less sensitive it is, the less amount of light is captured during the time the light is hitting the sensor. This is useful in dark situations so that you can capture more when there is a lack of light, however, the more sensitive it is, the more noise/grain is seen on the image. You're also going to lose details.

- Long Exposure: Long exposure is when you have the open shutter for a few seconds to a few minutes, maybe more, to get an image. Because you're allowing more time for the light to hit the sensor, it also means you don't need to use a high ISO to capture more light, and can use a low ISO to keep more detail and quality in your final image. If desired, multiple long exposures can also be combined together to add more effect to the photo. A fun trick people like to do also is light painting during long exposures which is when you shine a light unto an object whilst taking the long exposure. You can shine multiple lights, even different colours if you wish.
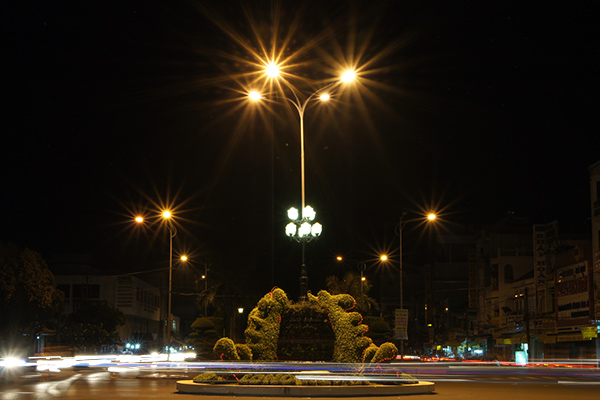
- Macro: Macro is when you try to capture images of the subject at a 1:1 ratio - in essence, life size. Normally, you'll need special lenses designed specifically so that you can get in close to the subject and capture life size images. There are some lenses which have macro capabilities, however, they don't have true 1:1 ratios.
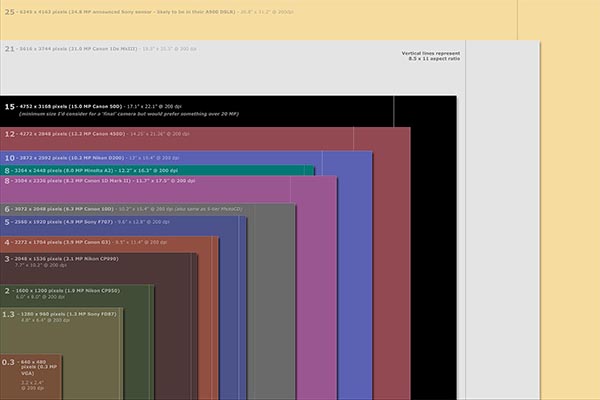
- Megapixels: The sensors of the camera are made up of photodiodes, which is what actually captures the light. The number of pixels depict the number of these diodes are on the sensor, being in the millions. Thus 0.3MP is about 300 thousand photodiodes, where 8MP is 8 million, just as 16MP is 16 million, and so on. The less there is, the bigger the diodes can be, thus better light capturing potential, meaning less noisy images. Alternatively, the more there is, thus smaller the diodes, thus the less light capturing potential for each diode, but the more detailed the images can be, since the one scene is captured using millions of micro segments, rather than just thousands.
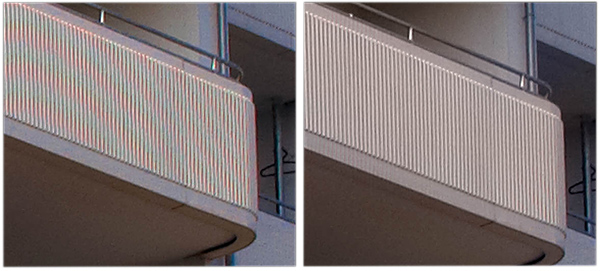
- Moire: Moire is an undesirable pattern that occurs when the camera tries to take an image of a scene that contains other patterns, which can cause these other patterns to clash. For example, the balcony has a lot of vertical lines, so on the left, the camera starts molding all the lines together, whilst trying to keep it separate (as it should). The right image shows what the image should be without moire.
- Noise/Grain: What the speckles and grain you see in the image are known as - noise. Usually in the shadows and darker areas, you'll see that the colour in the image isn't very smooth, but speckled and patchy, etc. It's also known as muddy as it isn't clear and sharp.
- Raw: DSLRs will generally offer two image formats, raw and jpeg. Raw is the original unprocessed file containing all the information and details captured by the sensor. The jpeg file is the processed file which includes all the changes and effects you may have set on your camera, eg. black & white, higher contrast, brighter/darker, etc, and gets rid of the rest of the information to cut down on file size, thus all of the extra detail and colour is now lost. The reason raw is important is that any effects you've set on camera will not affect the raw files (the information is there so you can quickly turn on the effects, or manually adjust the effects you want from the beginning) - it'll just be the plain dull version of the image you just took. This is useful when you decide that you don't like the black & white image, but rather have it in colour or shot over or underexposed, etc. If you shot in jpeg only, that's all you'll have, but in raw, you still have the dull coloured version, which you can then edit to brighten up, add more colour, etc. Sometimes, raw allows you the chance to make the effects and edits to the image better than what the camera has done and provided as a jpeg file.

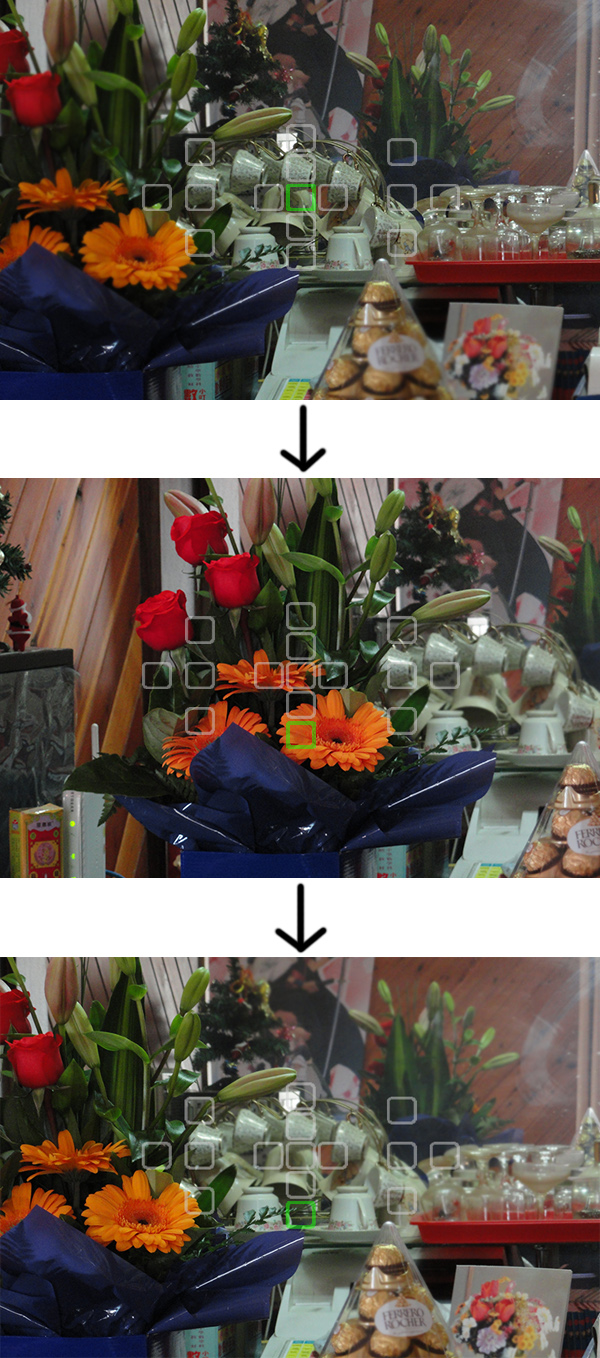
- Recomposing: Recomposing is a technique used when you want a certain composition and subject in focus but there's no focus point available on your subject to choose from. You put the closest focus point available on the subject first, even though it's not the composition that you want to shoot, focus the shot, then recompose to the composition you want, with the subject now in focus, to take the shot.
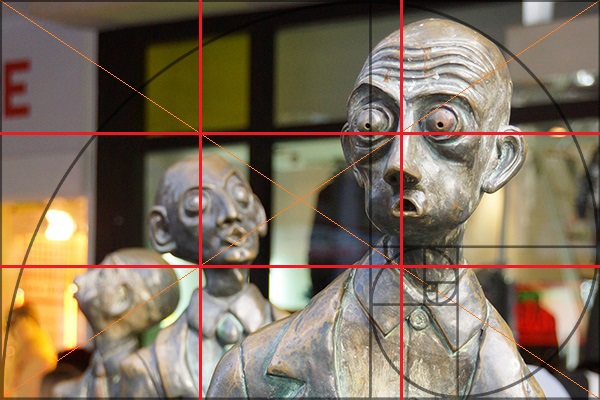
- Rule of Thirds: The rule of thirds is a general guideline to let you know how to compose and frame your subject, so that it looks natural and pleasing to the viewer. It isn't the be all and end all of photography, but merely a guide, and there are many cases where you wouldn't need to follow it. And just like the rule of thirds, there are many other guidelines for composing an image - spirals, lines, centers, horizontals, etc.
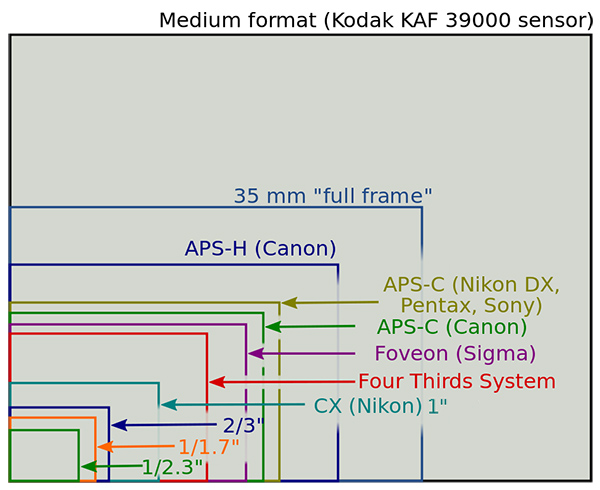
- Sensor: The device in the camera which captures the light coming into the camera, allowing the camera to turn the light into an image. They come in many sizes, typically 1/2.3", 1", APS-C, Micro Four Thirds, and Full Frame. The bigger the sensor, the more potential it has to gathering and capturing light, thus cleaner and sharper images.
- Shadows: The dark areas of an image. When the dark areas are completely black and there's no detail, it's known as the details being crushed. When the shadows are crushed, you can't recover any details and they'll just be black, thus you don't want any crushed shadows.

- Shutter Speed: Controls how much time the light is allowed into the camera. The faster the shutter speed, the less amount of time the light has to get in, thus less motion is captured in the image, and vice versa, the slower shutter speeds allows more time for the light to get in, which in turn captures more motion. Catching less motion is also known as freezing the action, and capturing more motion is also known as long exposures.
- Stops: Stops is a value that represents the difference in exposure that the camera thinks it should have been. The camera isn't always right however, and for creative purposes, you may also purposely choose to under or overexpose. However, when the camera is right, or it is also the exposure you want, knowing the stops of difference will allow you to make adjustments to your ISO, shutter, and aperture accordingly so that you can brighten, darken, or change one setting and know how much to change on another setting to maintain the exposure you want. For example, if the image you have exposed is 1 stop underexposed, -1EV, then you need to brighten it by a stop. You can do this be increasing the shutter time, using a wider aperture, or a higher ISO, equivalent to a stop in light difference depending on the current value.
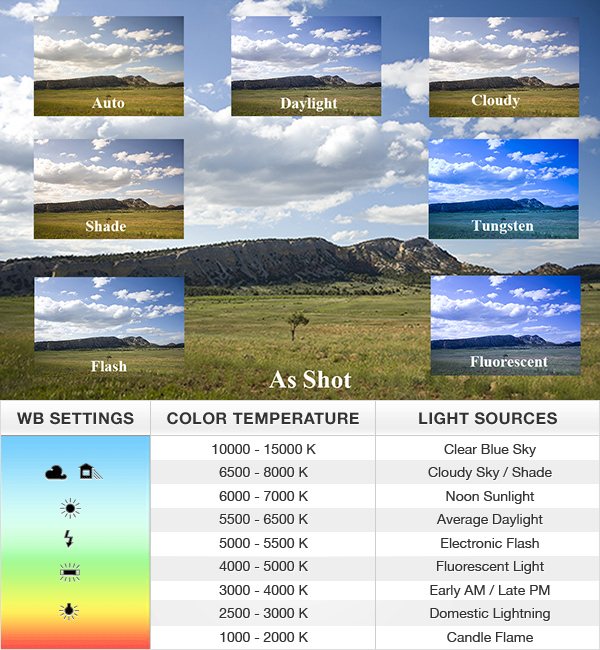
- White Balance: Allows you to adjust how the camera responds to the light, and type of light, around you. Typical light sources that the camera can detect are daylight, cloudy, tungsten, fluorescent, shade, and flash. Cameras generally also have a custom option which allows you to select a colour to base your light on, as though that colour is the colour that the light source is emitting. The purpose of white balance is to counteract the detected light in the scene and try to balance it to make it more natural. For example, tungsten light is generally orange, thus it'll try to add more blue into the image to balance the orange. So if you use tungsten outside on a sunny day, which is quite bright and blue, it'll be adding more blue to the scene. Instead, daylight should be used where it tries to add more yellow into the image.
